Pages

Showing posts with label tutorial. Show all posts

Monday, March 28, 2016

DIY: Jewelled Rings

diy jewelled wire ring

Hello all!

I have not blogged in ages as exams are approaching soon and I've been knee-deep in notes, flashcards and textbooks. Nonetheless, I have a really quick DIY for you today to satisfy any crafty cravings and to prove to you that yes, I am still alive!

You will need:
- wire
- wire cutters
- superglue
- jewel beads
- some round object the size of your finger


diy jewelled wire ring

Let's begin!

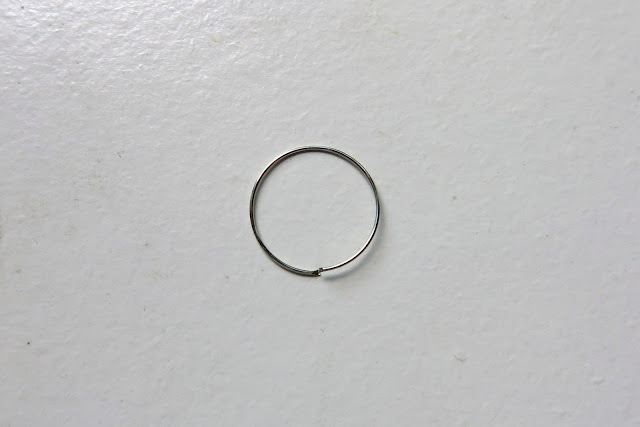
1. Take your length of wire and wrap it around your round object, forming an O.

diy jewelled wire ring

2. Slide that O off the object and cut down the middle as indicated below:

diy jewelled wire ring

You should end up with what is essentially a massive jump ring.

diy jewelled wire ring

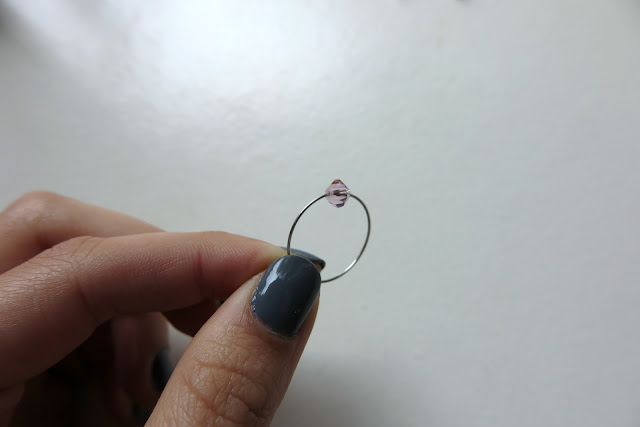
3. Open the ring as you would with a jump ring, and slide your bead onto the ring. 

diy jewelled wire ring

4. Close the ring and superglue both ends together. Slide the bead over the two glued ends and add a drop of superglue into the hole of the bead to fully seal everything. 

diy jewelled wire ring

Voilà! You're ready to rock your jewelled ring!

diy jewelled wire ring

I was inspired to make these rings because I have just finished watching Star Wars Episodes 1-6, and - aside from being fully caught up and psyched up to join the fandom - it got me thinking about character aesthetics and what colours would represent them. The black ring was made with Darth Vader in mind because when watching RotS, I remember thinking, "That is one hella shiny suit!" Keep up with my Star Wars obsession here on my tumblr c:

Anyways, I've been and will be posting considerably less due to exams, but a cheeky post may spring out once in a while. Be updated every time I post by following me on Bloglovin here or subscribing to the mailing list on the side bar!


Have an awesome day x

Sunday, August 30, 2015

DIY: Beaded Quote Bracelet

diy beaded quote bracelet
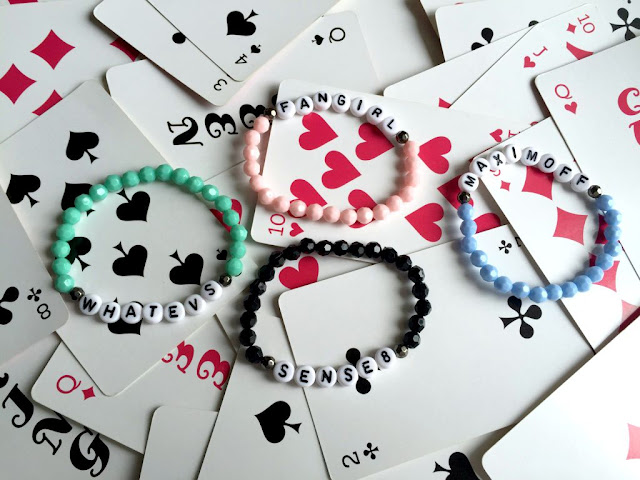
Summer is *supposedly* ending soon as we drift into September, but if you know anything about Hong Kong you'll know that we don't feel a single breeze until the middle of October. Taking advantage of the still-warm weather and short sleeves, I've created these colourful beaded quote bracelets that make for super cute arm candy!

You will need:
  • 6mm pineapple beads in colours of your choice
  • 5mm metallic pineapple beads
  • round alphabet beads
  • elastic string
  • a ring
  • scissors
diy beaded quote bracelet
s
Let's begin!

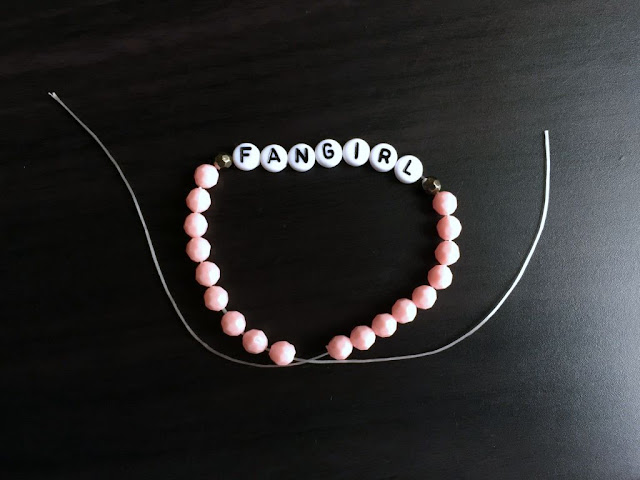
1. Lay out your word/phrase/quote. As I'm constantly being inspired by Tumblr culture, I went with 'fangirl'.

diy beaded quote bracelet
s
2. Cut a 30cm strand of elastic string. You probably won't need as much, but it's always best to play it safe in case of any adjustments needed. Tie one end to a ring in a reef knot (a single knot followed by another knot, but with the opposite string looping down), leaving a tail. String on some 6mm beads, a 5mm bead, your phrase, another 5mm bead, and finish with more 6mm beads.

diy beaded quote bracelet
s
3. Once you feel like your bracelet is long enough, undo the reef knot and adjust if necessary. You'll want the number of 6mm beads to be equal on both sides. To try the bracelet on, tie both ends of the string in a single knot and pinch that knot while slipping it onto your wrist.

diy beaded quote bracelet
s
4. Finish everything off by tying both sides of the string with a double knot. 

diy beaded quote bracelet
s
I made a Sense8 bracelet because OMFG, that show is mind-blowing; a 'whatevs' bracelet for those 'meh' days; a 'fangirl' one, and a 'Maximoff' one in homage to the ever-gorgeous, amazing Maximoff twins (not going to lie, I'm still bitter about Pietro's death). 

This DIY is totally customisable, from the phrase you choose to the colours of the beads. Go to town on this one, and flaunt your _____ pride!


Whee, that's all from me today! Hopefully I'll get my August favourites up on the channel next week. In the meantime, check out my channel here and my other links on the sidebar.


See you soon! x


Friday, August 14, 2015

DIY: Marble Notebook

diy back to school marble notebook
s
It's now August, and officially back-to-school season. *screams*

Maybe you're like me, and you're kindasortaabsolutely dreading the upcoming academic year. Or maybe you're as cool as an ice-cube. Either way, it doesn't hurt to go back to school in style! Here is an easy DIY for a chic marble notebook you'll love taking notes in.

You will need:

  • marble contact paper (also known as PVC)
  • black duct tape
  • a plain notebook of your choice
  • a cutting mat
  • scissors
  • a ruler
  • a cutting blade

diy back to school marble notebook

Let's begin!

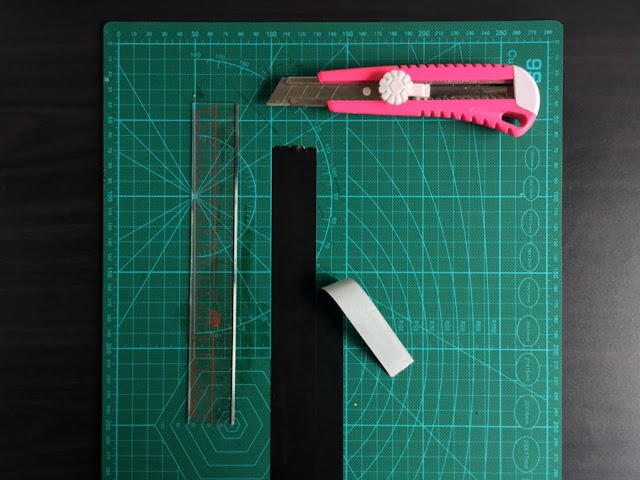
1. Take a strip of duct tape and trim it to 3cm wide, the length being the length of your notebook. What I did was tape the strip to my cutting mat and followed the guides on it when cutting.

diy back to school marble notebook
s
2. Cover the spine of your notebook with the duct tape. I eyeballed the position of the duct tape to make sure both front and back were somewhat equal. 

diy back to school marble notebook
s
3. Cut out a piece of marble paper that is bigger than your notebook (I'd say about a 1.5cm margin but you don't have to do this too accurately). The purpose of doing so is that the edges will be folded in after to give your notebook a clean finish. When cutting, ensure that at least one of the longer sides is absolutely straight. 

diy back to school marble notebook
s
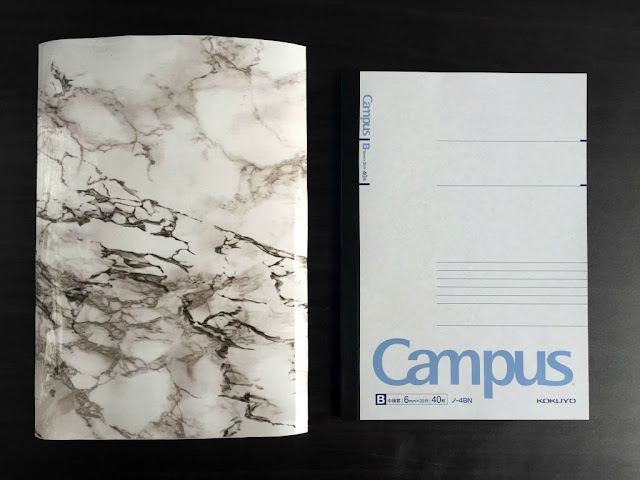
4. Peel off the backing paper from the side on which you will start sticking to the notebook. Line up the straight edge to the edge of the duct tape. As you peel and stick the of the rest of the paper, use a ruler to push out all the air bubbles.

diy back to school marble notebook
s
5. Fold the excess marble paper up, so it is hidden behind the cover.

diy back to school marble notebook
s
6. Repeat steps 3-5 on the back of the notebook and you are finished!

diy back to school marble notebook
s

It's safe to say that I am in love with this notebook! It's simple, yet classy, and it makes for a great present. Not only can this notebook be used at school, but it also serves as a stylish addition to your desk or workplace.

That is all from me today! Before I sign off, here's a little something I found in the deep waters of Pinterest to fight off those first day/back-to-school jitters:

diy back to school marble notebook
s


Have a lovely day! x

Sunday, July 12, 2015

DIY: Tumblr Inspired Clear iPhone 6 Case

tumblr inspired diy phone case
s
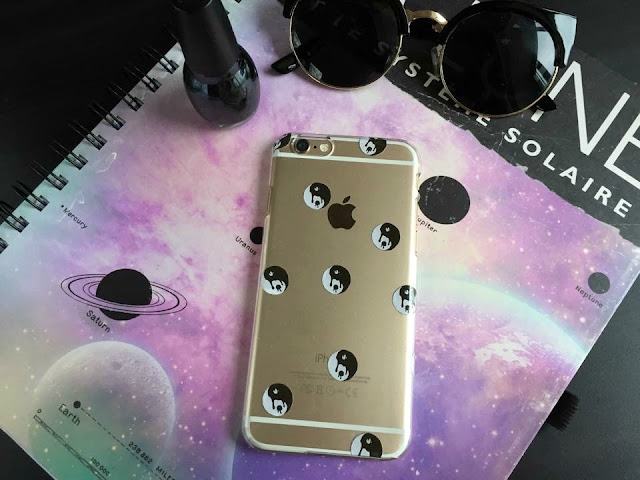
Ever since I got my iPhone 6 a few months ago, I've found out that I really like the look of clear cases on it, because the phone's own colour can still be seen. Not surprisingly, phone cases are overwhelmingly expensive and the ones I really like are out of reach. I took matters into my own hands and created several cases, all inspired by my many hours on Tumblr (as mentioned dozens of times). Continue on reading for a quick and easy tutorial!

You will need:
  • PVA glue (a.k.a Mod Podge, Elmer's glue, 白胶浆)
  • a small paintbrush
  • images for your design
  • a clear case 
  • scissors
  • something to hold your glue
tumblr inspired diy phone case
s
Let's begin!

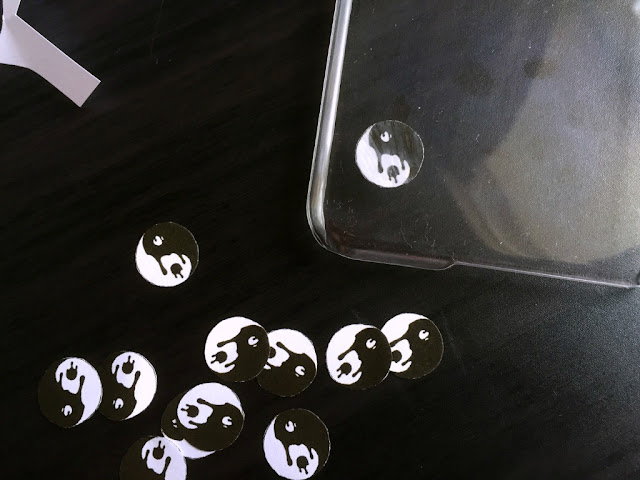
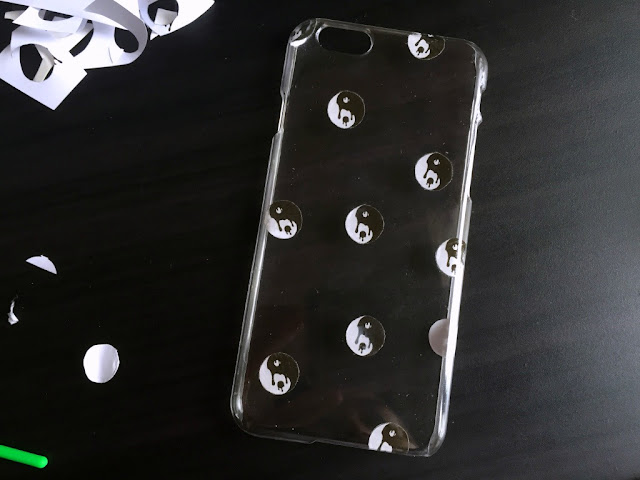
1. Find your images and cut them out. I found a dripping yin yang symbol on Google, scaled and sized it on Word, then printed them out.

2. Once your images are cut out, place them on top of your case to map out where you will stick them. 

3. Using your paintbrush, apply glue to the top of the image. Stick it onto the underside of your case (where it touches your phone). The glue will dry clear, and your design will be seen through the case.
tumblr inspired diy phone case
s
4. Continue glueing until your design is complete. Leave everything to dry overnight, and you are done!
tumblr inspired diy phone case
s
You can find clear cases online for relatively cheap (I got mine for under $10 each!), so buy a stack and go to town with it. There are endless designs you could do and naturally, I couldn't just create one!
tumblr inspired diy phone case
s
I created the 8-bit speech bubble case in honour of one of my favourite Avenger, and to express my frustration that he is dead (Marvel, kindly revive Quicksilver in the upcoming Civil War please!). I used mixed media for the other case (not really), using a combination of printed images and flash tattoos. One of the great things about this DIY is that you can create a design that compliments your phone colour, or clashes to create a statement. Of course, this isn't only limited to iPhone 6's. 
tumblr inspired diy phone case
s
This has got to be one of my favourite DIYs that I've ever done. Phone cases are one of my all-time favourites, so check out my other one here that I did a while back (the format may be different as I wrote it while the blog was still named Love From Icy. Updated links are on the sidebar.) 


Hope you enjoyed this post! I'll see you next time! x

Sunday, June 7, 2015

DIY: "Cute But Psycho" Pocket Tee

cute but psycho diy t shirt
s
Hey there!

I'm back with another DIY. I gained inspiration for this tee through my many hours on Tumblr (of course) and thought it would be a fun DIY to write a post on. The whole process is relatively easy to do, but the embroidery may take you longer to finish. Anyways, let's get to it!

You will need:

  • a white pocket tee
  • black thread
  • sewing needle
  • chalk marker

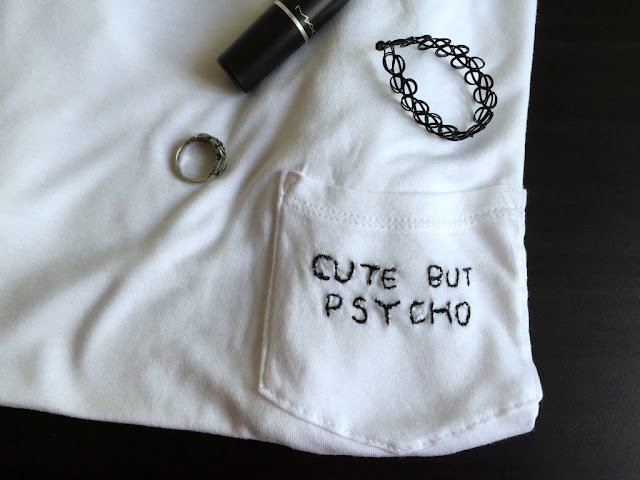
1. Write the words onto the pocket using a chalk marker. Personally I had to use a fineliner because the chalk marker wasn't showing up on the material. It washed away easily in the wash afterwards.
cute but psycho diy t shirt
s
2. Using your needle and thread, go through the words using a straight stitch. Go back and forth over the letters until you have your desired thickness. I went through the letters three times: from one end to another, back, then again to the other end.
cute but psycho diy t shirt

cute but psycho diy t shirt
s
The steps for this DIY are so easy, but getting everything right can be hard. I personally struggled with getting the shapes of the letters right, and trying to get the thickness to be even. But eh, I'm pretty satisfied with the outcome!

I am so sorry for missing out on a post last week, and I know, I was supposed to do my May Favourites. For the past month I've been busy with mock prep, so nothing interesting really went on. But alas, I have a plan! I will combine my May and April Favourites into one video, which will come out next month. Also there is a possibility I will be going on holiday next month, so there may be a few vlogs up on my channel. I had this DIY stored in my drafts folder anyway, so I think everything turned out alright!


Hope you have a lovely day! x

Wednesday, April 8, 2015

DIY: Marker Mug

s
Hello all!

How are you all doing? We're into the second week of Easter break and I have not done ANY work. Most of my time has been spent lazing around at home, while my Science textbook and English essay sits, untouched, on my desk. ARGH! 

I'm back this week with another DIY. I wanted to pick up a new mug, since I've been consuming more tea lately, but the designs out there just weren't cutting it. They just seemed so generic! Today's DIY will teach you how to make a super-cute, customisable mug.

You will need:

  • a mug
  • an oil-based permanent marker
  • alcohol
  • an oven
  • cotton pads and cotton buds
s
Let's get started!

1. Clean your mug to get rid of any dirt or residue. Where you're going to draw, clean that area with some rubbing alcohol.

2. Now it's time for your imagination to flow! I went for a Kingsman quote to express my undying love for the movie, but it's really up to you. The design can be as intricate as you want. Not a very good artist? Try typography, like I did.
s
*As a bonus, I also wrote inside the mug.
s
3. After drawing your design once, let the ink dry. When it has dried, go over your design. The ink will fade slightly when baked in the oven, so keep that in mind when designing.

4. Place your mug into a cold oven. Set the temperature at 220 ºc for 45 minutes. You want your mug in there before it gets hot so the mug can heat up with the oven to prevent cracking.

5. When the mug has finished baking, let it cool and repeat the baking process. This ensures the design will stay on the mug.

6. After the mug has cooled for the second time, you are done!

A lot of people have attempted this DIY and didn't get the results desired. Here are some tips to ensure that you do:
  • Buy a cheap mug, where the glaze is thin. If you pick up an expensive mug, chances are the glaze is very well done and thick. If the glaze is too thick, the marker won't be able to penetrate it when the mug is being baked.
  • Go with an oil-based permanent marker. I'm not too sure on why it's better than a regular permanent marker, but it stays on better on the mug.
  • Contrary to other tutorials, 175 ºc isn't hot enough for the ink to penetrate the mug. 220 ºc should do the trick.
s
And there you have it! I've super pleased with my mug and now I can drink my tea with style. A personalised mug makes an awesome gift, and it just so happens that Mother's Day is approaching soon!


Bye for now! x

Sunday, February 1, 2015

DIY: Heat Transfers

Hello peeps!

How are you all doing? As I'm writing this I'm plugged in to Fall Out Boy's 'American Beauty/American Psycho'. Wonderful album! We're approaching February now and I'm excited for two things: Chinese New Year and my birthday! January was nice but, I have to say, a bit of a slow start to the year; it mainly consisted of my favourite TV shows coming back (as mentioned in my latest update and January Favourites) from the winter hiatus. I'm eager to see what February brings!

Today's post is a DIY using heat transfers. I have been looking for it since forever, and I was beyond ecstatic to have found it. It was my first time using them and I was quite happy with the outcome.

oh hey there Sheldon

Let's get going!

You will need:

  • heat transfer paper
  • a printer
  • Microsoft Word or any other alternative
  • an iron
  • a plain light-coloured tote/pouch

To start off I purchased my transfer paper in Mong Kok East, in an art store called Art Supplies Professional. There were five sheets in the packet and it costed me $65. A little pricey but when split between all the design possibilities, not that bad.  

1. Open up a doc and on it paste in your designs. I created the 'Professional Fangirl' text myself with one of the default fonts, and I found the The Flash logo on Google. Use the functions to size your design to scale. 

ignore the 'peasants' thing, it was for a present :-)

2. From here you'll want to follow the instructions that come with the paper. On my packet it told me to flip all the images. On Word you do this by right clicking < Format Shape < 3-D Rotation. On where it says 'X' change the 0° to 180°. 


3. This is optional but you may want to print a copy of your design on normal paper, just to make sure everything fits alright on your tote/pouch. 

4. Print out your design with the heat transfer paper. 

5. Cut your designs out as close to its lines as possible. 

6. Depending on your heat transfer paper, you may get different instructions; my packet said to turn the iron on high heat. Place the design, front facing down, onto your pouch/tote and iron for a minute or so, making sure the heat is spread evenly out.


7. For a shiny finish on the design, immediately peel the backing paper before it cools. For a matte finish, peel the paper after it cools.

You are done!


I decided to go for a The Flash design to display my love for the show and Grant Gustin. I mentioned it all in my January favourites; watch it here! The 'Professional Fangirl' design is to tell the world that yes, I am a fangirl and if I have any fangirl fits it is perfectly normal!

From my experience with heat transfer paper, I learnt the hard way that the fabric you're ironing on has to be smooth. If not, the design cracks and starts to peel. Just a warning peeps!


If you've enjoyed this post, don't be shy to leave a comment down below. I would love to hear what you guys have to say :-)

That is all for today and I'll see you next week! x

Sunday, January 4, 2015

DIY: Watercolour Jewellery Dish

Hello there!

Today I have a DIY jewellery dish for you that I have been seeing constantly on Pinterest. The watercolour design makes for a great display piece on where you can organise random bits and bobs. It is not at all hard to make so let's get straight into it!


You will need:
1. nail polishes of your colour choice
2. small white dishes/plates
3. a bowl big enough to put your dish/plate into*
4. paper towels and kebab sticks for cleanup during the making process

I used purple polish for the actual DIY

*sidenote - you will be dropping nail polish into this so make sure it's not a bowl that you use for eating!

1. Fill your bowl 3/4 way with water. Ensure that your dish is clean and has no residue.

2. Place a drop of nail polish into the water, and wait for the drop to spread out and expand. You can speed it up by blowing at the polish drop.


3. Once you have your desired spread-out-ness (totally did not make that phrase up ;-)), dip your dish into the nail polish layer and take it out of the water with a scooping motion. How this all works is that you are making the layer of polish cling to your dish, creating a pretty watercolour effect.


4. Wait for a few minutes for the polish to set, then you can repeat the step above as many times as you want to get the look you desire. This is when you can switch up the colours and layer the polishes. To get rid of the remaining polish on the surface of the water, if any, use a kebab stick to sweep it out.


5. Let your dish dry and set for at least 5 hours. If there are parts of the design that you aren't satisfied with, use nail polish remover to remove it (as you can see from above there are some dots of teal which I removed later). Spray a clear coat after everything is dry.


I love how the nail polish spreads; it creates a wonderfully unique watercolour design. You can use your dish for anything: jewellery, daily essentials, those darn bobby pins and hair ties that keep running away on their own! These jewellery dishes make a great birthday present for a friend, or something for you to keep and display. 


Tomorrow is back to school for me from winter break, and I have to say I'm slightly nervous. I am almost certain that when I get back, my brain will be mush and I won't be able to remember anything. Ahhh, the joys of being a teenager!


That's all for today and I'll see you next week xx


Back to Top